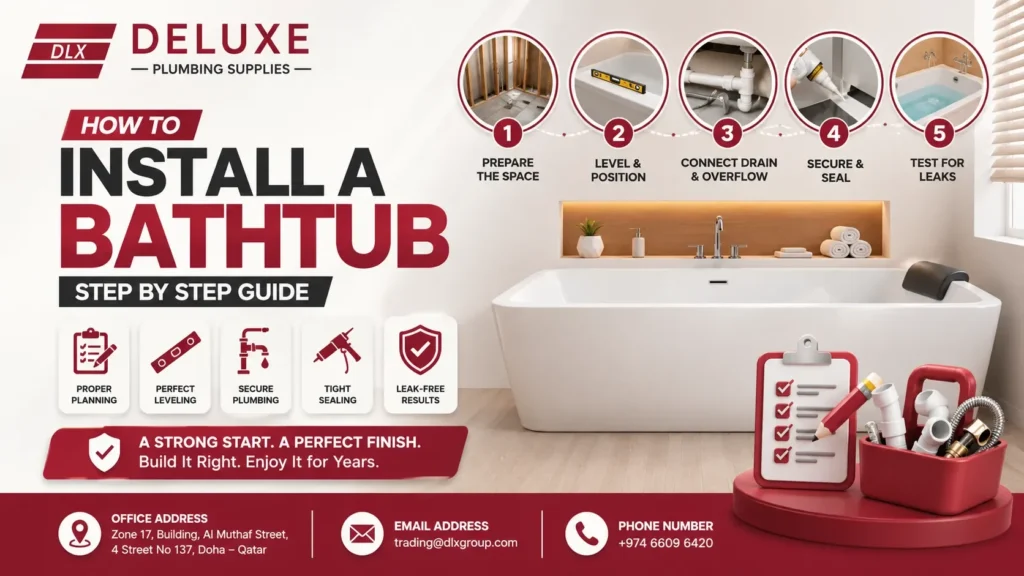
Installing a bathtub involves preparing the bathroom, positioning the tub correctly, connecting the drain and overflow, securing the fixture, sealing the surrounding joints, and testing the plumbing. A successful installation depends on accurate measurements, proper support, correct plumbing connections, and careful leak testing.
This step-by-step bathtub installation guide explains what you need, how to prepare the space, how to level and connect the tub, which mistakes to avoid, and when professional plumbing help is the better choice. It also explains how the right plumbing supplies can make the installation easier and more reliable.
What Do You Need to Install a Bathtub?
You need the bathtub, appropriate drain and overflow fittings, plumbing connections, support materials, a level, measuring tools, sealant, and basic hand tools to install a bathtub correctly. The exact materials depend on the bathtub type and the manufacturer’s installation instructions.
Basic tools and materials
You may need:
- Measuring tape
- Spirit level
- Screwdriver
- Adjustable wrench
- Pliers
- Drill and suitable bits
- Tub drain tool
- Silicone or bathroom-grade sealant
- Drain and overflow assembly
- Waste pipe and fittings
- Mounting or support hardware
- Protective gloves
Before starting, check the bathtub manufacturer’s instructions. Different tubs can require different supports, fixing points, drain assemblies, or installation methods. Also confirm that the bathroom has suitable water and waste connections. If the plumbing layout does not match the tub, the pipework may need to be changed before the bathtub is installed.
How Do You Prepare the Bathroom for a Bathtub Installation?
Preparing the bathroom means creating a clean, level, accessible space and confirming that the plumbing connections are in the correct position. Good preparation reduces alignment problems and makes the final leak test easier. Start by removing the old bathtub or other fixture if one is already installed. Clear debris from the floor and inspect the installation area.
Check these points before bringing in the new tub:
- Measure the space: Confirm the bathtub will fit between the walls and through the access route.
- Check the floor: The base should provide suitable support and should not have obvious damage or movement.
- Locate wall studs: Identify where the tub can be secured according to the manufacturer’s instructions.
- Check the drain position: Make sure the waste connection can reach the bathtub drain.
- Confirm water connections: Check that hot and cold supply lines are accessible where required.
- Plan access: Keep enough access for connecting and testing the plumbing.
If the floor or wall structure needs repair, complete that work before installing the bathtub. Installing over an unstable surface can create movement, poor drainage, or seal failure. With the bathroom prepared, the next priority is accurate bathtub positioning.
How Do You Position and Level a Bathtub?
Positioning and leveling the bathtub correctly ensures proper support, alignment, drainage, and a clean finished appearance. The tub should sit exactly where intended before permanent plumbing and fixing work is completed. Carefully move the bathtub into position. Avoid forcing it into a tight opening because this can damage the fixture or surrounding surfaces. Use a spirit level to check the tub according to the manufacturer’s instructions. Check the tub from more than one direction rather than relying on one measurement.
Why is bathtub leveling important?
A level installation helps the bathtub drain correctly and keeps the fixture stable. Poor alignment can also make wall joints uneven and place unnecessary stress on seals. Follow the bathtub’s specified support method. Some models use adjustable feet, while others require a prepared support surface or specific framing. Do not assume that sealant can compensate for an incorrectly supported bathtub. The structural support should be correct before the final sealing stage. Once the tub is correctly positioned and supported, you can move to the drain and overflow connections.
How Do You Connect the Bathtub Drain and Overflow?
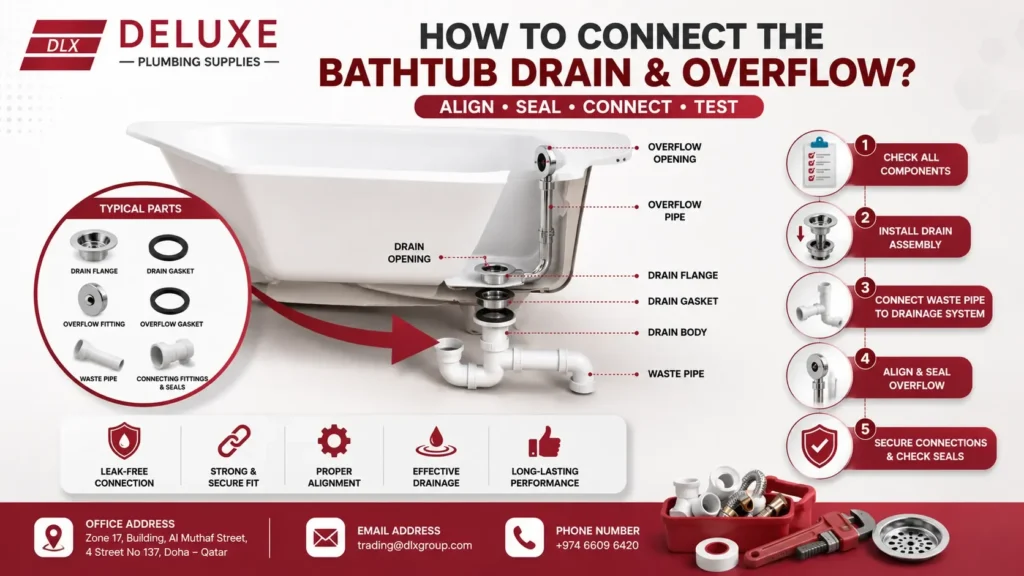
The bathtub drain and overflow connect the tub to the waste plumbing system and must be aligned and sealed correctly to prevent leaks. The drain normally connects at the bottom of the tub, while the overflow protects against water rising above the tub’s intended level. Begin by checking all components in the drain and overflow assembly.
Typical parts include:
- Drain flange
- Drain gasket
- Overflow fitting
- Overflow gasket
- Waste pipe
- Connecting fittings
- Appropriate seals
Install the drain assembly according to the manufacturer’s instructions. Make sure the gasket and sealing components are correctly positioned before tightening the fitting. Do not overtighten fittings. Excessive force can damage components or create sealing problems. Connect the waste pipe to the building drainage system using compatible fittings and the correct connection method. The pipe should be properly supported and should not place strain on the bathtub drain.
The overflow connection also needs careful alignment. Check the seal around the overflow opening before finishing the installation. For a reliable result, use compatible bathroom plumbing fittings rather than trying to force mismatched components together. After the drain and overflow are connected, the bathtub needs to be secured and the visible joints sealed.
How Do You Secure and Seal a Bathtub?
Securing and sealing the bathtub prevents movement and helps protect joints from water penetration. The tub should be firmly supported before sealant is applied around the edges. Follow the manufacturer’s fixing instructions and secure the bathtub to the recommended wall or support points. Then inspect the gaps between the tub and surrounding wall surfaces. Apply a suitable bathroom-grade sealant where required.
What makes a good bathtub seal?
A good seal should:
- Cover the intended joint continuously
- Adhere to clean, dry surfaces
- Have no obvious gaps
- Remain neat around corners
- Be compatible with the bathtub and surrounding materials
Do not seal over dust, standing water, or loose material. Clean and dry the surfaces first. Avoid creating unnecessary sealant thickness. A clean, continuous joint is generally easier to maintain than a large excess of sealant. If a tub surround, wall panel, or tile finish is being installed, follow the manufacturer’s instructions for the correct sequence between the tub, wall finish, and sealant. Once the tub is secure and sealed, the final stage is testing the complete installation.
How Do You Test a Newly Installed Bathtub?
You should test the bathtub by filling it with water, checking the drain and overflow, inspecting every plumbing connection, and confirming that water drains correctly without visible leaks.
Step-by-step bathtub leak test
- Inspect the connections: Look around the drain, overflow, and waste connections before adding water.
- Fill the tub: Add enough water to test the normal operating area.
- Check the overflow: Allow water to reach the overflow opening and inspect the connection.
- Inspect underneath: Look for drips around the drain and waste pipe.
- Drain the tub: Release the water and watch the waste connection while water flows through the system.
- Check the surrounding seal: Look for gaps or movement around sealed joints.
- Repeat if necessary: If you find moisture or a leak, stop using the installation until the cause is corrected.
Do not treat a small leak as harmless. A slow leak inside a wall, floor, or enclosed plumbing space can cause damage over time. If you cannot safely access or verify the plumbing, a qualified plumber should inspect the installation before the bathroom is put into regular use.
Which Bathtub Installation Mistakes Should You Avoid?
The most common bathtub installation mistakes involve poor measurements, inadequate support, incorrect drain connections, weak sealing, and skipping the final leak test.
Avoid these problems:
| Mistake | Why It Matters |
| Installing on an unstable base | Can cause movement and seal failure |
| Skipping the level check | May affect drainage and alignment |
| Using incompatible fittings | Can create leaks or poor connections |
| Overtightening drain fittings | May damage components |
| Sealing dirty surfaces | Reduces sealant performance |
| Ignoring the overflow | Creates an important leak risk |
| Skipping the water test | Problems may remain hidden |
| Blocking plumbing access | Makes future maintenance harder |
Planning the plumbing before installation is usually easier than correcting problems after the bathtub has been fixed and sealed.
When Should You Install a Bathtub Yourself or Hire a Plumber?
A simple replacement may be suitable for an experienced DIY installer, while complex plumbing changes, difficult access, structural work, or uncertain waste connections are better handled by a qualified plumber.
DIY may be reasonable when:
- The new bathtub fits the existing space.
- Drain and water connections already align.
- No major pipework changes are required.
- You understand the manufacturer’s installation instructions.
- You can safely test the finished plumbing.
Professional help is recommended when:
- Drainage pipes must be relocated.
- Water supply lines need major changes.
- The floor or wall requires structural repair.
- The installation involves concealed plumbing.
- You cannot confidently identify a leak.
- Local plumbing requirements require professional work.
The goal is not simply to install the bathtub. It is to create a stable, properly connected, accessible, and leak-free bathroom fixture.
How Can You Choose the Right Bathtub Plumbing Supplies?
Choosing the right bathtub plumbing supplies means matching the drain, overflow, waste connections, fittings, sealants, and installation hardware to the bathtub and existing bathroom plumbing.
Before buying, confirm:
- Bathtub model and dimensions
- Drain location
- Waste pipe size and connection type
- Overflow configuration
- Required fittings
- Compatible sealing products
- Manufacturer installation requirements
Buying compatible components together can reduce the risk of discovering a missing or incorrect fitting during installation. For homeowners, contractors, and bathroom installers, Deluxe Plumbing Supplies can be a useful source to explore when planning a bathroom plumbing project. The right product selection should always be based on the bathtub specifications and the actual plumbing layout.
For related projects, consider linking this guide to your internal pages for bathtub plumbing supplies, bathroom plumbing fittings, and bathroom installation supplies. These links create a natural path from installation information to relevant products.
Why Choose Deluxe Plumbing Supplies for Bathtub Projects?
Deluxe Plumbing Supplies can support bathtub projects by helping customers connect installation requirements with the plumbing products needed for the job. A useful supplier relationship should make product selection clearer rather than simply adding more products to the project.
When selecting plumbing supplies, look for:
- Compatible bathroom fittings
- Clear product specifications
- Reliable installation components
- Suitable plumbing accessories
- Support for project-based product selection
Whether you are replacing one bathtub or preparing supplies for a larger bathroom project, matching each component to the installation requirements is the best way to reduce avoidable problems. A well-planned bathtub installation starts with the right measurements and ends with a complete plumbing test. By preparing the bathroom, leveling the tub, connecting the drain and overflow correctly, securing the fixture, sealing the joints, and checking for leaks, you can create a safer and more dependable installation.
Frequently Asked Questions
How long does it take to install a bathtub?
A bathtub installation can take several hours when the existing space and plumbing connections are already suitable. The time can increase if the floor needs repair, the drain must be relocated, or new plumbing connections are required.
How do you know if a bathtub drain is leaking?
Fill the tub and inspect the drain, overflow, waste pipe, and surrounding connections for moisture or dripping. Drain the bathtub and check the plumbing again while water is flowing through the waste system. Correct any leaks before regular use.
Why is bathtub sealing important?
Proper sealing helps protect joints around the bathtub from water penetration. Surfaces should be clean and dry before applying compatible bathroom sealant, and the finished seal should be continuous without obvious gaps.
When should I hire a professional plumber?
Consider hiring a qualified plumber when the drain or water supply needs major changes, the floor or wall requires structural repair, plumbing is concealed or difficult to access, or you are unsure whether the finished connections are leak-free.
What should I check before installing a bathtub?
Check the bathtub dimensions, bathroom space, floor condition, wall support, drain position, water connections, waste connection, and access for future maintenance. Confirm the manufacturer’s installation requirements before beginning the work.