Installing a thermostatic valve correctly is important for safe, stable, and reliable water temperature control. A thermostatic mixing valve combines hot and cold water and delivers mixed water at a controlled temperature.
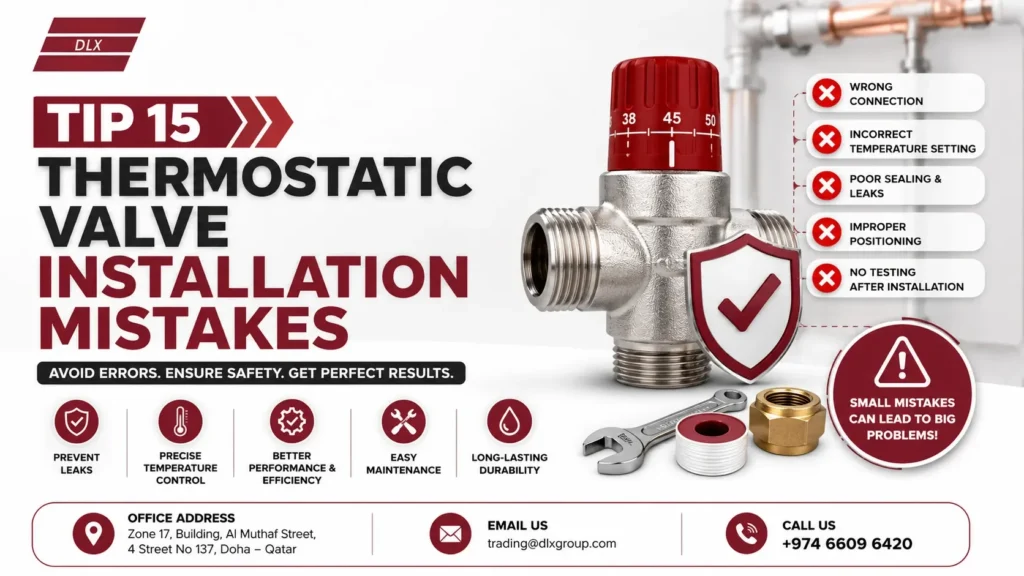
The most common problems come from wrong connections, poor positioning, incorrect temperature settings, weak sealing, and skipping final testing. This guide covers 15 thermostatic valve installation mistakes so installers, maintenance teams, and commercial building operators can identify problems before they affect performance.
Whether the valve is being installed in a residential system, hotel, hospital, school, or other commercial building, following the correct installation process can improve safety, comfort, and long-term reliability.
What Are the Most Common Thermostatic Valve Installation Mistakes?
The most common thermostatic valve installation mistakes involve incorrect connections, poor orientation, inadequate pipe support, wrong temperature adjustment, poor sealing, and failure to test the system after installation.
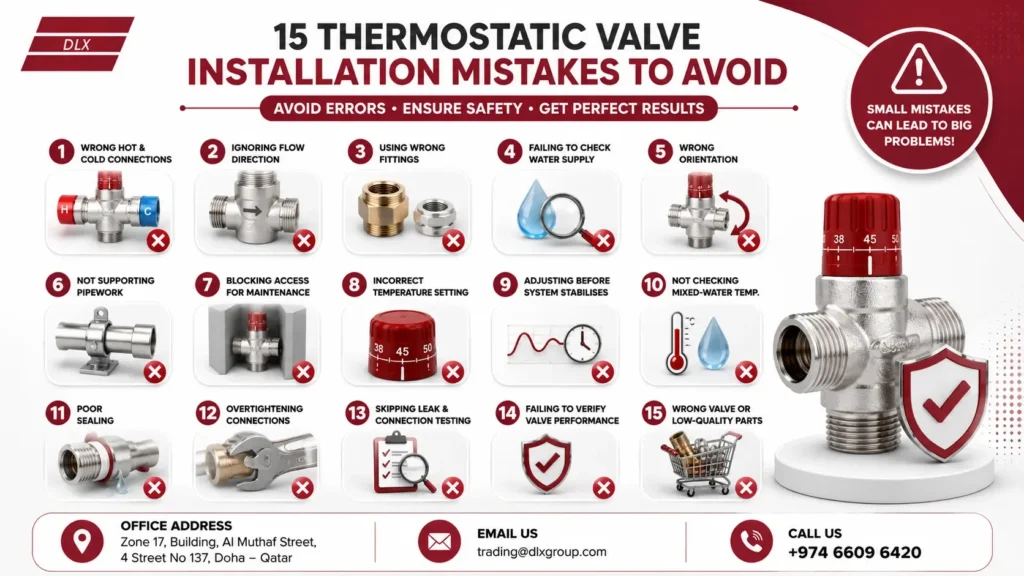
1. Connecting the Hot and Cold Inlets Incorrectly
A thermostatic mixing valve needs the correct hot and cold water supplies to regulate temperature properly. Connecting the supplies to the wrong ports can cause unstable temperature control or poor valve performance.
Always identify the hot inlet, cold inlet, and mixed-water outlet before connecting the pipework.
2. Ignoring the Valve’s Flow Direction
Many thermostatic valves have markings that show the intended flow direction. Ignoring these markings can affect how water moves through the valve.
Check the manufacturer’s instructions and the markings on the valve body before installation. The uploaded installation material specifically identifies hot, cold, and mixed-water connections as key installation points.
3. Using the Wrong Fittings
Poorly matched fittings can create leaks, installation stress, or connection problems. The fitting should match the valve connection, pipe material, size, and application.
For commercial plumbing, using suitable, durable components is especially important because the system may operate for long periods and serve many users.
4. Failing to Check the Water Supply
Do not assume that the hot and cold supplies are ready simply because the pipes are connected.
Check the supply arrangement before commissioning the valve. Confirm that both supplies are available and that the system is free from obvious installation issues.
5. Installing the Valve in the Wrong Orientation
The valve should be installed according to the manufacturer’s specified orientation. Incorrect positioning may interfere with connections, adjustment, or servicing.
Look for body markings, flow arrows, and connection labels before tightening the system.
6. Failing to Support the Pipework
A thermostatic valve should not be expected to carry unnecessary pipework weight. Unsupported pipes can place mechanical stress on the valve and its connections.
Use suitable pipe supports and make sure the valve remains stable after installation. The supplied installation guidance also highlights the need to “orient & support” the valve and pipework.
7. Blocking Access for Maintenance
A valve may work correctly when first installed but become difficult to service if it is hidden behind fixed equipment or installed in a cramped location.
Leave enough access for inspection, temperature adjustment, cleaning, testing, and future replacement.
8. Setting the Temperature Incorrectly
Do not simply turn the control to a preferred number without checking the actual mixed-water temperature.
Use the valve’s adjustment mechanism according to the manufacturer’s instructions, then verify the water temperature at the outlet.
9. Adjusting Before the System Stabilises
Water temperature can change while the system is settling. Making adjustments too quickly can lead to repeated corrections.
Allow the system to reach stable operating conditions before making the final adjustment.
10. Failing to Check Mixed-Water Temperature
The temperature setting on the valve is not a substitute for checking the actual outlet temperature.
Use an appropriate thermometer and confirm that the mixed-water outlet reaches the intended operating temperature. The installation materials specifically identify temperature adjustment, mixed-water temperature checks, and system stabilisation as important verification stages.
11. Using Poor Sealing Methods
A poor seal can allow water to escape around threaded or joined connections. Before commissioning, inspect every connection for signs of leakage.
Use the sealing method recommended for the specific valve and fitting. Do not assume that adding more sealing material always creates a better seal.
12. Overtightening the Connections
Overtightening is another common installation mistake. Excessive force can damage threads, fittings, or valve components.
Tighten connections correctly and follow the manufacturer’s installation instructions rather than relying on maximum force.
13. Skipping Leak and Connection Testing
After installation, inspect all connections and check the system under normal operating conditions.
Look for:
- Water leaks
- Loose connections
- Incorrect pipework
- Unstable temperature
- Unusual flow behaviour
The supplied installation guide places “test & verify” after the connection and adjustment stages, showing that commissioning is an essential part of the process.
14. Failing to Verify Valve Performance
A valve may appear correctly installed but still perform poorly.
Check whether the mixed-water temperature remains stable and whether the valve responds correctly to changes in the water supply. Record the final settings where appropriate so maintenance teams have a useful reference.
15. Choosing the Wrong Valve or Low-Quality Plumbing Components
The final mistake can happen before installation even begins: selecting a valve or supporting component that does not suit the application.
Consider:
- Required flow rate
- Temperature range
- Connection size
- Pipework arrangement
- Building type
- Maintenance requirements
- Manufacturer specifications
For commercial projects, product selection should also consider long-term reliability and service access.
Which Thermostatic Valve Mistakes Matter Most in Commercial Buildings?
In commercial buildings, the most serious mistakes are incorrect connections, poor support, wrong temperature settings, inadequate testing, and unsuitable product selection.
Hotels, hospitals, schools, gyms, and other high-use buildings need reliable temperature control because plumbing systems may serve many users throughout the day. The supplied Deluxe Plumbing Supplies materials specifically position thermostatic mixing valves for commercial applications and emphasise safety, consistent temperature, maintenance, and performance.
For these environments, installation should be treated as a complete process rather than simply connecting a valve to pipework.
How Can You Choose the Right Thermostatic Valve and Plumbing Supplies?
Choosing the right thermostatic valve starts with understanding the application, water supplies, connection requirements, and expected operating conditions.
A reliable plumbing supplier can help identify compatible valves, fittings, accessories, and supporting components. This is particularly useful for commercial projects where incorrect sizing or unsuitable components can create expensive installation and maintenance problems.
Before purchasing, confirm the valve specifications and installation requirements. Then make sure the supporting plumbing supplies are compatible with the complete system.
Why Choose Deluxe Plumbing Supplies for Thermostatic Valve Solutions?
Deluxe Plumbing Supplies provides a commercial-focused approach to plumbing products, helping customers connect product selection with installation requirements and long-term system performance.
For thermostatic valve projects, the key value is not simply having a valve available. It is having access to suitable plumbing components and product guidance that support correct installation.
When comparing options, look for:
- Suitable thermostatic valve specifications
- Quality plumbing components
- Commercial application suitability
- Clear installation guidance
- Reliable product support
This approach helps installers avoid the common mistake of treating the valve as an isolated component rather than part of a complete water-control system.
What Should You Check Before Using a Newly Installed Thermostatic Valve?
Before putting a newly installed thermostatic valve into regular service, complete a final installation and performance check.
Final Thermostatic Valve Checklist
- Confirm the hot inlet is correctly connected.
- Confirm the cold inlet is correctly connected.
- Confirm the mixed-water outlet is correct.
- Check the valve orientation.
- Confirm the pipework is properly supported.
- Inspect all fittings and seals.
- Check for leaks.
- Allow the system to stabilise.
- Adjust the temperature correctly.
- Measure the mixed-water outlet temperature.
- Confirm stable operation.
- Record important settings for future maintenance.
A structured commissioning process helps catch small installation mistakes before they become larger plumbing problems.
Frequently Asked Questions
Can a thermostatic mixing valve be installed incorrectly?
Yes. Incorrect hot and cold connections, wrong orientation, poor sealing, unsupported pipework, and incorrect temperature adjustment can all affect valve performance. Always check the valve markings and manufacturer’s installation instructions before commissioning.
Why is my thermostatic valve not controlling temperature correctly?
Incorrect connections, unstable water supplies, poor installation, or incorrect adjustment can cause temperature problems. Start by checking the hot and cold connections, then verify the mixed-water outlet temperature after the system has stabilised.
Should a thermostatic valve be supported?
Yes, the surrounding pipework should be properly supported so unnecessary mechanical stress is not transferred to the valve or its connections. The valve should also remain accessible for inspection and maintenance.
How do you test a thermostatic mixing valve?
Check the connections, inspect for leaks, confirm hot and cold water supplies, allow the system to stabilise, adjust the valve, and measure the mixed-water outlet temperature. Then verify that the temperature remains stable during normal operation.
What happens if hot and cold connections are reversed?
Reversed connections can prevent the thermostatic valve from operating as intended. Temperature control may become unstable or unreliable. Always identify the hot and cold ports before connecting the pipework.
Can you overtighten a thermostatic valve connection?
Yes. Excessive tightening can damage threads, fittings, or valve components. Connections should be tightened according to the manufacturer’s instructions and the requirements of the specific fitting.
Why is temperature testing important after installation?
Temperature testing confirms that the valve is delivering the intended mixed-water temperature rather than simply relying on the setting shown on the control. It is an important part of final commissioning.
Final Thoughts: How Can You Avoid Thermostatic Valve Installation Mistakes?
The best way to avoid thermostatic valve installation mistakes is to follow a clear sequence: identify the connections, install the valve in the correct orientation, support the pipework, seal connections correctly, adjust the temperature, and test the complete system.
For commercial plumbing projects, correct product selection is equally important. Using suitable thermostatic valves and compatible plumbing supplies can support safer, more consistent, and more reliable system performance.